.svg)

Creating an Effective Design Approval Process
Learn what a design approval process is, why it’s important, and some tips for creating and implementing one.


When it comes to creative design, gaining approval for things like websites, PDFs, user interfaces, sales collateral, and advertisements can be a difficult task. Projects often get stuck in production and are never finished due to poor planning and communication.
In many cases, design failures boil down to poor project management. In fact, the failure rate for projects is a whopping 70 percent, which stems from the fact that 42 percent of companies don’t understand the importance of project management. Because of this, it’s critical to have an effective design approval process in place to move projects forward to completion.
Looking to improve the way your team handles design approvals? You’re in the right place. Read on to learn what a design approval process is, why it’s important, and some tips for creating and implementing one.
What Is a Design Approval Process?
A design approval process is a framework for managing design from end to end, from initial planning discussions to final approval and publishing. This is typically a multi-step process, which may require approval and signoffs at various stages. Here’s a general overview of how the process works:
1. Project approval
Before any communication or production begins, project managers typically need to gain approval from internal stakeholders who control budgets and make high-level decisions. For example, a middle manager may approach a marketing director for approval on a PDF or blog post.
2. Planning
After gaining initial project approval, the design process moves into the planning stage. At this point, stakeholders communicate their ideas with content designers, developers, and producers. The production team reviews the request and submits an initial plan or draft for approval, along with an expected completion time.
3. Production
Once the production team gains approval, work commences. Depending on the nature of the project, there may be additional approval steps during the production stage. For example, additional permissions may be necessary for resources like personnel, budget, tools, or ideas.
4. Publishing
At a certain point, stakeholders and producers agree to a final draft or product and approve the item for release. All team members must clearly sign off on the project before it goes live.
5. Monitoring and review
Certain assets like websites or applications may require additional monitoring and changes after moving into production. As such, it’s necessary to have a system in place for team members to efficiently request and approve changes on a rolling basis.
Why Is a Design Approval Process Necessary?
Having a formal design approval process may seem inefficient or counterproductive, especially for small teams who work collaboratively together. But sticking to a process ultimately leads to a more efficient and productive system. Here’s why:
Lower production costs
Design projects can be expensive, especially when paying designers or developers on an hourly basis. A detailed design approval process makes it easier to track time, distribute work, and request changes. This helps keep projects under budget.
Inclusivity
Design projects tend to be more impactful when they feature input from multiple team members. Having a formal design approval process makes everything more inclusive, open, and fair. It’s a great way to encourage teamwork and collaboration and make team members feel like they have a hand in production.
Consistency
Every piece of collateral that a company creates is ultimately an extension of its own brand. Putting items through a rigorous design process ensures that all pieces align with the company’s messaging and style. This reduces risk and results in higher-quality products and services.
Best Practices for Creating a Design Approval Process
Before rushing in and creating a design approval process, there are a few things to keep in mind. After all, the process you implement will ultimately have a big impact on production. For this reason, it’s critical to form a plan that aligns with your team and your unique needs.
Keep the following best practices in mind when forming a design approval process to ensure the best results.
Centralize the process
One of the most important things to do when creating a design approval process is to establish a single source of truth using a platform like Slack. Centralizing operations prevents team members from using multiple channels to request approvals. It also eliminates errors and miscommunications.
Determine responsibilities
In order for a design approval process to work effectively, all team members need to be aware of their roles and responsibilities. There shouldn’t be any question about who has the final say with approvals or which team members should be approached when decisions need to be made. To ensure that’s the case, you should clearly outline approval roles and share them with relevant stakeholders.
Strive for open communication
Creative work can be highly subjective. It can be hard to make final decisions and proceed with confidence. As a result, there should be a system in place that enables teams to explain the creative strategy while also providing a forum for having open conversations about individual projects. It helps to use a platform where team members can chat via text, phone, or video and work together on documents in real-time. This enables teams to tackle challenges and build confidence together, making it easier to understand why certain changes may be necessary.
How to Implement a Design Approval Process
Design approval workflows vary from company to company. But in general, you can use the following steps to chart a course and form one.
"The first thing you’ll need to do is choose a platform where team members can share information and communicate as a group."
1. Choose a platform
The first thing you’ll need to do is choose a platform where team members can share information and communicate as a group. Before selecting a platform, consult with your team and determine how they prefer to communicate and which platforms they may already be using. Once you pick an appropriate platform that everyone is comfortable with, make it official and request that all approval decisions and project-related communications flow through that particular channel.
2. Determine the key players
After you select a platform, document your design approval team. Make a list of all in-house designers, freelancers, and vendors, as well as managers, directors, or executives who may be necessary for providing approvals on specific projects. Then add each team member to the platform you’ve selected so that everyone is on the same page.
3. Create approval workflows
Once your team is aligned and set up on your approval platform, you can focus on creating specific approval workflows. At this stage, you may want to work with technical team members to create and automate an approval hierarchy.
4. Iterate and adjust
Team members, projects, and requirements change over time. To keep up, teams need to make adjustments to workflows and procedures. As such, it’s necessary to revisit your process every few months to ensure it stays up-to-date and in line with your company’s evolving environment.
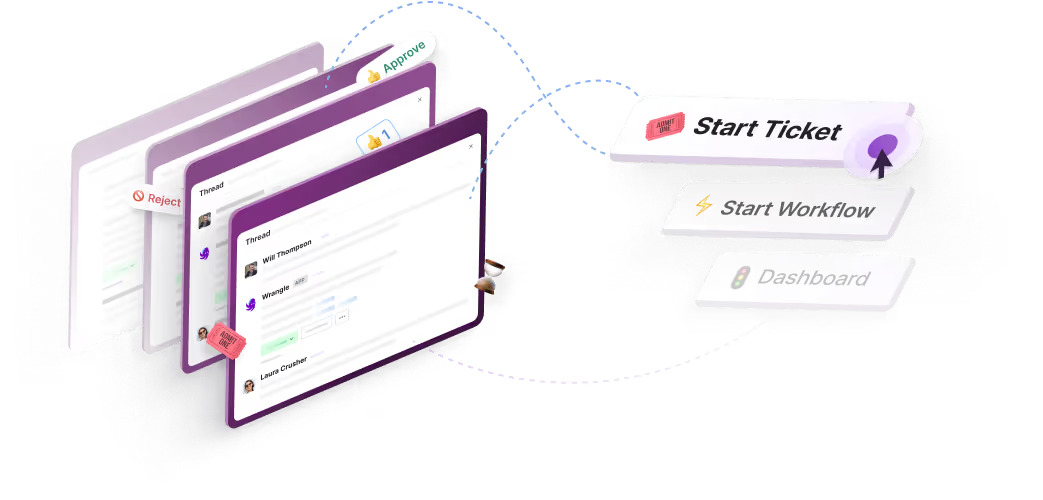
Wrangle Automates the Design Approval Process in Slack
When it comes to managing approvals, Slack is one of the best tools on the market. It’s easy to use, reliable, and secure. But Slack isn’t perfect, and its main drawback is that it forces team members to sit inside the platform and wait for updates and notifications, which isn’t always practical or realistic.
Wrangle is a purpose-built Slack app that allows teams to manage workflows and ticketing directly in Slack channels. By enhancing Slack with Wrangle, you can automatically route requests to appropriate team members, ensuring that nobody misses important approvals.
We can use Wrangle to quickly create a design approval request. To get started, add Wrangle to your Slack workspace. It’s free for a small team with a limited feature set.

Once you’ve added Wrangle to your Slack, you’ll want to create a workflow. We have several templates for a variety of use cases. You can also create one from scratch. Let’s select “blank” and create a design approval process workflow.

Wrangle can create seamless workflows that streamline a variety of approvals. Here’s an example of a simple workflow. In this case, a web designer has completed his design. Now, he will submit the creative for approval. This process could be used for internal staff or by an external stakeholder like a customer if you’re a creative agency.
In this instance, our workflow will ask for reviews and approval from
- Creative Director
- VP of Demand Gen
- CMO
The first step is to create a simple intake form that will be accessible in Slack. When a user requests an approval, this form will collect the relevant information. We’re building our intake form in the Wrangle web app, but the user will simply access it in their Slack channel. We’re collecting the name of the asset, the asset type, a URL that could route them to Figma, and a screenshot of the design.

Now that our form has been created, we will create the approval steps. These are the parts of the workflow that require a manager to give our design a thumbs up. When deployed, the user will kick this process off in Slack. We’ve created approval steps for the Design Director, our VP of Demand Gen, and the CMO.

Note that each time an approval or rejection occurs, updates will be posted in our #content-reviews Slack channel. When we’ve finished creating each approval step, we can publish this form, and it will immediately be available in our company’s Slack channel.

To access the workflow, simply type /wrangle anywhere in Slack or click on the Wrangle app icon on the left menubar of your Slack UI. Look under Apps. From there, click Start a Workflow. A dropdown will appear with a list of all your company workflows.

We created our workflow to include an attachment. To keep things efficient, Wrangle will now open the workflow in our web browser, where the requestor will fill out the form and request approval for their design.

Remember, our form included the name of the project, the asset type, and the URL where the full asset can be reviewed, and we’ve attached the screenshot. When we hit submit, a notification will appear in the Slack channel we selected during the form setup process.

From here, the design director can view the asset and decide what happens next. He can approve the design, which would move on to the VP of Demand Generation for their approval. He could also request changes or simply reject the requests. At each stage of approval, updates will be posted automatically in Slack, so the requestor is always up-to-date on the status of her design request. When the request has gone through all the approval stages, we’ll notify everyone on the chain and in the channel.

And Wrangle’s web UI and agent dashboard provides an instance view that lets users see the complete history of the request.

To experience how Wrangle can streamline the design approval process for your organization, try a demo today or add it to your Slack workspace for free.
This post was written by Justin Reynolds. Justin is a freelance writer who enjoys telling stories about how technology, science, and creativity can help workers be more productive. In his spare time, he likes seeing or playing live music, hiking, and traveling.
Wrangle learns from your tickets and knowledge base to handleup to 75% of Slack questions automatically.

4.7 Average rating


Turn Slack into a productivity powerhouse with Wrangle
Create a scalable helpdesk in Slack. Automatically turn messages into trackable tickets and provide faster, more transparent service to your colleagues and customers with Wrangle — Try it free!
Wrangle learns from your tickets and knowledge base to handleup to 75% of Slack questions automatically.
4.7 Average rating