.svg)

Slack Integrations With Jira: Uses and How to Set It Up
Using Slack integrations with Jira helps your team stay on top of critical updates. Learn how to connect the two applications.


Do you use Slack and Jira? If so, take advantage of these two powerful applications' tools for working together. It's an excellent way to be more productive and increase your work output.
Integrating the two functionalities opens up a world of possibilities: you assign tasks and complete them in one place, discussions can happen in real-time without logging out or emailing back and forth, and you can automatically update documentation on both ends.
Using Slack integrations with Jira ensures your team will never miss critical updates. This post will walk you through integrating and connecting the two apps.
What Are the Benefits of Slack Integrations with Jira?
Integrating Slack with Jira can significantly impact your business, making tracking project status and monitoring tasks easier. Many teams use Slack for daily message exchanges, including announcements, reminders, Q&A, and "back-and-forths" between team members.
It's also the fastest-growing workplace app, meaning it's likely used by many of your colleagues. Integrating Slack with Jira can help you increase visibility and ensure your team is working in the same direction.
There are many communication benefits to integrating Slack with Jira. Listed below are just a few:
- faster problem resolution/resolution tracking
- increased visibility as a tool to reach out and discuss issues with your team
- better information-sharing throughout the organization
How to Integrate Slack With Jira
Installing Slack is a straightforward process. It takes just a few clicks if you already have an existing Jira installation. We'll walk you through the process of installing and setting up Slack integration.
3 Steps of Slack Integrations With Jira
- Prerequisites
- Jira cloud installation on Slack
- Slack add-on in Jira
Prerequisites
- A Slack account with admin privileges
- A Jira account with admin privileges
- Use the desktop app or access both apps on the browser
Slack Add-on in Jira
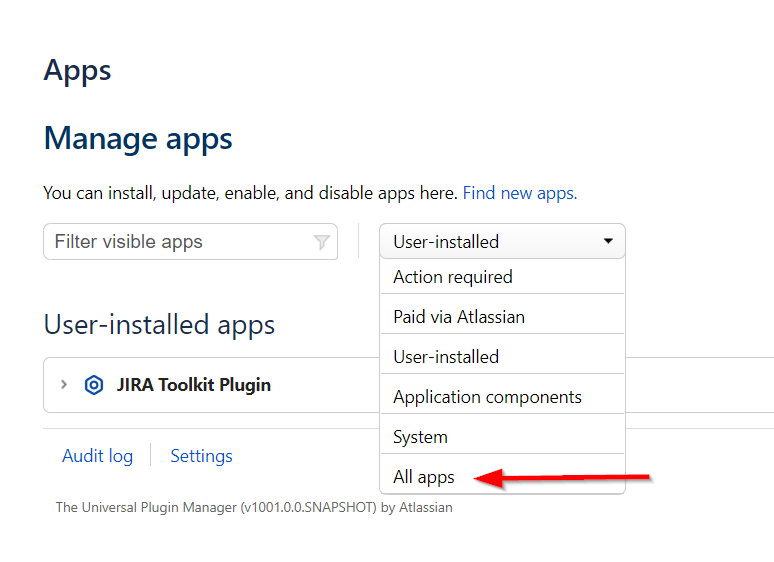
Go to Jira, click on the "Apps" tab, and click "Manage your Apps" in the drop-down list.
On this page, select the "Action required" drop-down and choose "All apps."
Scroll down until you find Slack, and click to bring up more details about this integration. You'll get a description of what Slack does and a short installation guide.
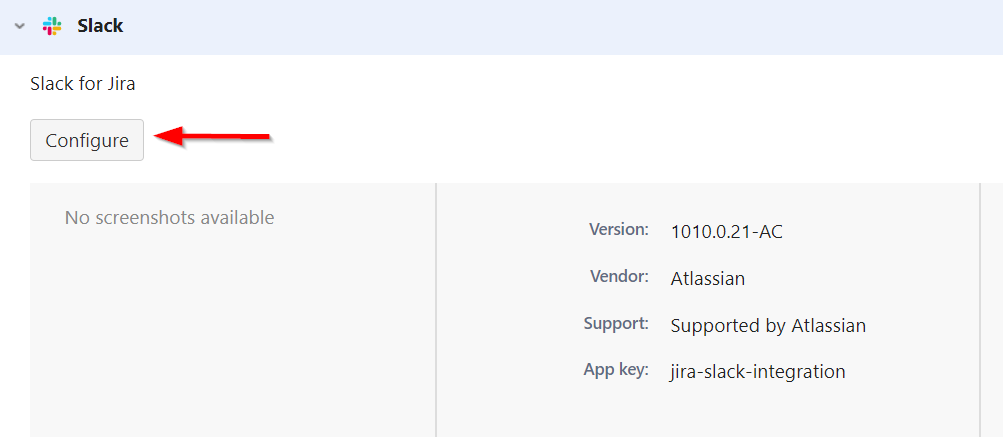
Go to "Configure." This will bring up a "Slack Integration Setup" page.
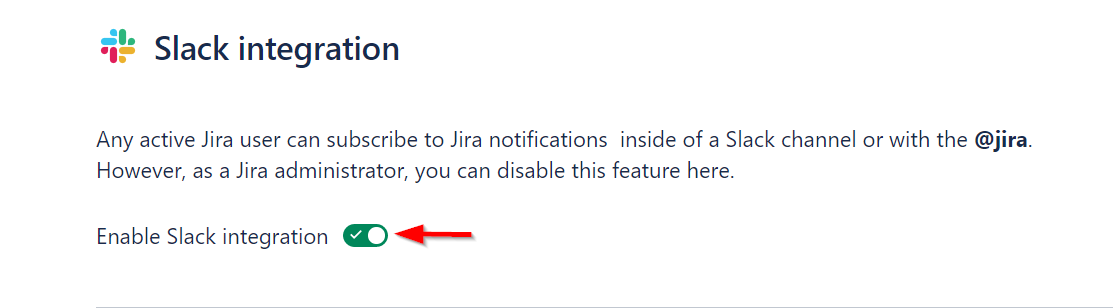
Click on the "Connect" button at the bottom of this page. We're now ready to use Slack in Jira!
Jira Cloud Installation on Slack
Log in to your workspace on Slack. Then, on the top left, select "Browse apps," where you'll get a drop-down list and should choose "Apps."

This takes you to the apps directory page, where you'll search for Jira cloud.
Click the "Add to Slack" button and follow the steps to grant Jira permission to access your workspace.

When you complete the steps, you'll get a successful dialog box.

How to Enable Notifications
You can use Slack to get notified when important events happen in Jira, like when an issue is created, updated, or resolved. You can also follow Jira issues in Slack, so you don't have to flip back and forth between tabs to see what's happening. This is one of the best features of this integration, as it notifies you when something happens in Jira.
You can enable notifications from Slack using /jira notify to manage personal notifications or /jira manage to connect and receive notifications from your project in Jira.

How to Enable Slack/Jira to Use a Private Channel
First, go to your Slack and create a private channel.
To add the Jira cloud to your private Slack channel, go to the private channel's homepage and type in "/invite @Jira."
Now you can do everything that you could do in your public channel, including creating issues and receiving notifications.
How to Create a Jira Ticket from Slack
- In the Slack channel, you've integrated with Jira, type "/jira create."
- A pop-up window will appear, asking you to enter the details of the Jira ticket. Enter a summary of the issue in the "Summary" field.
- Enter a more detailed description of the issue in the "Description" field.
- Select the Jira project where you want to create the ticket from the "Project" drop-down menu.
- Choose the Jira issue type you want to create from the "Issue Type" drop-down menu.
- If you want to assign the Jira ticket to someone, enter their username in the "Assignee" field.
- When you're finished, click "Create."
After you're done with the process, see a message in the Slack channel saying that a link has been sent to the ticket you created.
How to Use Slack and Jira Integration
- Track issues—Create separate channels for different projects and assign issues to team members. Then, track project progression with Slack updates!
- Collect team feedback—Use Polls in Jira as a channel for real-time feedback from your teammates and get a record of their responses in Slack.
- Gain project insight—Reply to comments on Jira issues with a status update: a small but mighty addition to the typical issue workflow.
- Get notified whenever someone responds to your tickets—Reply notifications ensure you're always aware of when and how other teams interact with your work.
- Start a conversation about a ticket—Add a post-it-style note to any ticket, which will be reflected in the associated conversation channel on Slack.
- Instantly let your team know—Create a direct link to a Jira ticket in Slack and immediately notify your team of an update.
- Get notified of new issues—Automatically create a channel for each new issue you create, then receive a message whenever someone adds a comment to the thread. Instantly connect with your team!
- Configure automatic updates—Set up automatic notifications whenever there's activity on any Jira projects.
Challenges in Slack/Jira Integration
Integrating with Slack is relatively easy after you've already learned the details. However, there are some instances where you may encounter problems.
You can't see everything about your Jira ticket from the Slack view. The integration won't pull in the full set of fields, so you may end up having to click to open the issue in the Jira web UI to see more.
Unfortunately, Slack doesn't display the conversation of various tickets raised using /jira create. Jira limits communication related to these tickets to Jira comments. Therefore, it's hard to keep track of discussions related to these tickets on slack.
One of the easiest ways to fix this issue is to leverage tools like Wrangle to help manage requests in Slack. This will allow you to keep track of all the details related to the various tickets being talked about in the channel.
The Benefits and Challenges of Integrating Jira and Slack
Slack integrations with Jira can improve your team's productivity and increase awareness of important information. For example, using Slack to automatically notify team members of new Jira issues assigned to them can help speed up the resolution process and allow other team members to see which issues they need to work on.
You can create Jira tickets from Slack by using the /jira command, or you can add keywords and phrases like "assignee," "status," or "component" and then use the add-on extensions provided by Slack for even more functionality.
But there are limitations. While you can create a Jira ticket in Slack and assign it to a Jira project board, you can't chat directly with the people who will work on your issue in Slack. Jira won't create a thread where you can all chat together.
Furthermore, when creating a Jira issue from Slack, your users will need to set the Jira project to which the issue should be posted to. If this isn't very clear to them, which is common in help desk scenarios, you're going to be manually rerouting issues to the correct board when your users get it wrong.
Also, when your users are creating a ticket, there's no way to present a custom form to them. So, for bug reports and feature requests, you have to message them for more details that they forgot to include.
Finally, you don’t have a template for capturing and tracking your work and the associated approvals. For example, if you’re working on a ticket for onboarding an employee, there's no way to have a checklist on the issue.
A New Way to Track Issues and Tickets in Slack
Wrangle provides teams with a more effective way of integrating Slack with an issue management and ticketing application. The future of work is distributed with conversations happening in our chat services. Wrangle brings order to the chaos of chat by allowing teams to access workflows and ticketing in Slack.
Wrangle automates your common business processes like issue tracking, IT ticketing, procurement approvals and more in Slack. Use multi-step forms with conditional logic to create dynamic workflows that your teams kick off in Slack. Wrangle automatically assigns tasks and approvals and reduces issues like manual channel management and status tracking. You’ll also have access to reporting, analytics, and auditing.
Add Wrangle to your Slack workspace or schedule a personal demo.
This post was written by Mercy Kibet. Mercy is a full-stack developer with a knack for learning and writing about new and intriguing tech stacks.
Wrangle learns from your tickets and knowledge base to handleup to 75% of Slack questions automatically.

4.7 Average rating


Turn Slack into a productivity powerhouse with Wrangle
Create a scalable helpdesk in Slack. Automatically turn messages into trackable tickets and provide faster, more transparent service to your colleagues and customers with Wrangle — Try it free!
Wrangle learns from your tickets and knowledge base to handleup to 75% of Slack questions automatically.
4.7 Average rating